课程来源
Spring
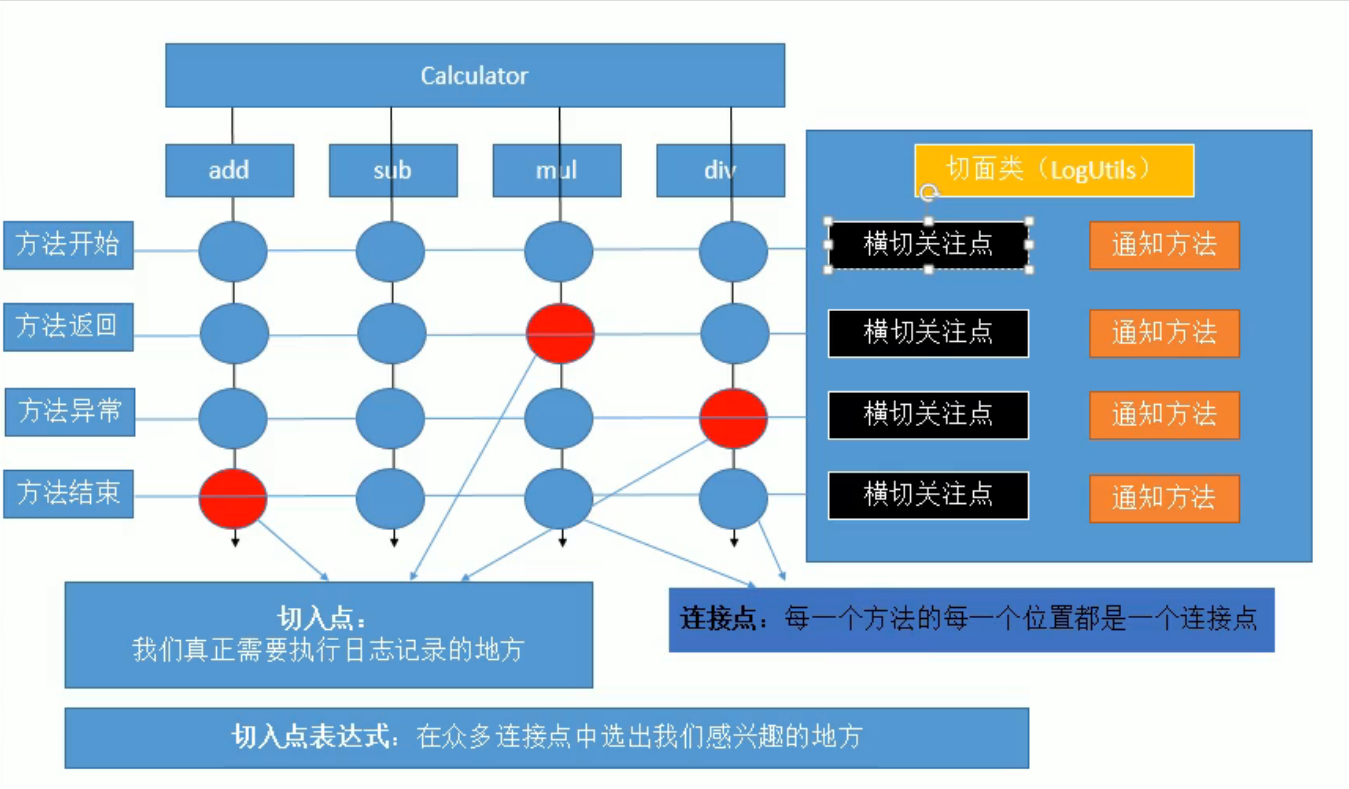
AOP
面向拉面切面编程。将某段代码动态切入到指定方法指定位置运行。
建议复习动态代理。但是默认的动态代理要求被代理的对象实现了接口……而且写起来非常麻烦。
来,咱来切一个拉面:
1
2
3
| public interface Calculator {
public int add(int a, int b);
}
|
1
2
3
4
5
6
7
| @Component
public class CalculatorImpl implements Calculator {
@Override
public int add(int a, int b) {
return a + b;
}
}
|
1
2
3
4
5
6
7
8
9
10
11
12
13
14
15
16
17
| package net.yxchen.util;
import org.aspectj.lang.annotation.Aspect;
import org.aspectj.lang.annotation.Before;
import org.springframework.stereotype.Component;
@Aspect
@Component
public class logUtil {
@Before("execution(public int net.yxchen.util.impl.CalculatorImpl.add(int, int))")
public static void beforeMethod() {
System.out.println("准备执行方法");
}
}
|
还有不要忘记在 applicationContext.xml 里头加上:
1
2
| <context:component-scan base-package="net.yxchen"/>
<aop:aspectj-autoproxy/>
|
整个测试:
1
2
3
4
5
6
7
8
9
10
11
| @ExtendWith(SpringExtension.class)
@ContextConfiguration(locations = "classpath:applicationContext.xml")
public class IOCTest {
ApplicationContext applicationContext = new ClassPathXmlApplicationContext("applicationContext.xml");
@Test
public void test1() {
Calculator calculator = applicationContext.getBean(Calculator.class);
System.out.println(calculator.add(2, 1));
}
}
|
成功了。不要忘记导入 aopalliance,aspectj.weaver 和 spring-aspects 三个 jar。
一些细节
如果打印一下 calculator 的类型,发现它是 class com.sun.proxy.$Proxy29 之类的。说明内部还是通过动态代理实现的。代理对象和目标对象惟一的相通点就是实现了同一个接口。
甚至把实现接口去掉也是可以的。这时候打印一发 getClass() 就是 class net.yxchen.util.impl.CalculatorImpl$$EnhancerBySpringCGLIB$$5b0b9650,说明是 cglib 干的。通过搞一个奇妙内部类和一些神奇的操作创建好了代理对象。
关于通知顺序:如果正常返回,就是 @Before -> @After -> @AfterReturning,出现了错误抛出异常就是 @Before -> @After -> @AfterThrowing。还有一种 @Around 环绕的,不说了。
获得切入点信息如下:
1
2
3
4
5
6
7
8
9
10
11
12
| @Aspect
@Component
public class logUtil {
@Before("execution(public int net.yxchen.util.impl.CalculatorImpl.add(int, int))")
public static void beforeMethod(JoinPoint joinPoint) {
Signature signature = joinPoint.getSignature();
String methodName = signature.getName();
Object[] args = joinPoint.getArgs();
System.out.println("准备执行方法 " + methodName +",参数列表为 " + Arrays.asList(args));
System.out.println("方法签名 " + signature);
}
}
|
顺带一提,在 AfterRunning 里头还可以钦点某个参数来接受返回值。这个自己点进去看吧。函数可以写得乱七八糟,参数列表一定不能乱写。
如果想提取切入点表达式,可以随便写一个空方法然后加 Pointcut。
1
2
3
4
5
6
7
8
9
10
| @Aspect
@Component
public class logUtil {
@Pointcut("execution(public int net.yxchen.util.impl.CalculatorImpl.add(int, int))")
private void exp1() {}
@Before("exp1()")
public static void beforeMethod(JoinPoint joinPoint) {
}
}
|
非常重要的 @Around,这东西看上去一个顶四,就跟动态代理特别像:
1
2
3
4
5
6
7
8
9
10
11
12
13
14
15
16
| @Around("exp1()")
public Object aroundMethod(ProceedingJoinPoint pjp) throws Throwable {
Object[] args = pjp.getArgs();
Object proceed = null;
try {
System.out.println("Before");
proceed = pjp.proceed(args);
System.out.println("AfterRunning");
} catch (Exception e) {
System.out.println("AfterThrowing");
} finally {
System.out.println("After");
}
return proceed;
}
|
可以看出,在添加了环绕通知以后,顺序变成了环绕前置-普通前置-方法执行-环绕返回/异常-环绕后置-普通后置-普通返回或者异常。前置方法没有定论,都可能在前头似乎。
如果多个切面套娃?呃,其实是按照字典序来的。也可以用 @Order 钦点顺序。默认值是 INT_MAX,越小优先级越高,越先执行越“在外头”。就好像洋葱头,真正的方法在里头,从外头向里头 Order 的数字增大。
如果低 order 套一个环绕(低是说 order 数字小),顺序就变成了环绕前置-低 order 前置-高 order 前置-方法执行-高 order 后置-高 order 返回-环绕返回-环绕后置-低 order 后置-低 order 返回。
上面说的都是注解的。其实还有配置的,就是写在 xml 里头。非常重要的一定要写在配置中,普通的就写注解就很可以了。
声明式事务
事务,就要操作数据库。用 Spring 提供的 JdbcTemplate 和那个 QueryRunner 差不多。但是不太重要。
声明式事务是和编程式事务相对的。如果在以前学的 java web 项目里头想要写一个事务出来,就得写一个 TransactionFilter 拦截所有的请求(哪怕是请求图片),在里头取消自动提交,try catch 一大堆……这就是编程式事务。现在来看一个例子:
1
2
3
4
5
6
7
8
9
10
11
12
13
14
15
16
17
18
19
20
| @Repository
public class BookDao {
@Autowired
JdbcTemplate jdbcTemplate;
public void balance(String userName, int price) {
String sql = "update account set balance=balance-? where username = ?";
jdbcTemplate.update(sql, price, userName);
}
public int getPrice(String isbn) {
String sql = "select price from book where isbn=?";
return jdbcTemplate.queryForObject(sql, Integer.class, isbn);
}
public void updateStock(String isbn) {
String sql = "update book_stock set stock=stock-1 where isbn=?";
jdbcTemplate.update(sql, isbn);
}
}
|
1
2
3
4
5
6
7
8
9
10
11
12
| @Service
public class BookService {
@Autowired
BookDao bookDao;
public void checkout(String username, String isbn) {
int price = bookDao.getPrice(isbn);
bookDao.balance(username, price);
bookDao.updateStock(isbn);
System.out.println("结帐完成");
}
}
|
1
2
3
4
5
6
7
8
9
10
11
12
13
14
15
16
17
18
19
20
21
| <?xml version="1.0" encoding="UTF-8"?>
<beans xmlns="http://www.springframework.org/schema/beans"
xmlns:xsi="http://www.w3.org/2001/XMLSchema-instance" xmlns:p="http://www.springframework.org/schema/p"
xmlns:context="http://www.springframework.org/schema/context"
xmlns:aop="http://www.springframework.org/schema/aop"
xsi:schemaLocation="http://www.springframework.org/schema/beans http://www.springframework.org/schema/beans/spring-beans.xsd http://www.springframework.org/schema/context https://www.springframework.org/schema/context/spring-context.xsd http://www.springframework.org/schema/aop https://www.springframework.org/schema/aop/spring-aop.xsd">
<context:component-scan base-package="net.yxchen"/>
<context:property-placeholder location="classpath:druid.properties"/>
<bean id="druidDataSource" class="com.alibaba.druid.pool.DruidDataSource">
<property name="username" value="${jdbc.user}"/>
<property name="password" value="${jdbc.password}"/>
<property name="url" value="${jdbc.url}"/>
<property name="driverClassName" value="${jdbc.driverName}"/>
<property name="initialSize" value="${jdbc.initialSize}"/>
<property name="maxActive" value="${jdbc.maxActive}"/>
<property name="maxWait" value="${jdbc.maxWait}"/>
</bean>
<bean id="jdbcTemplate" class="org.springframework.jdbc.core.JdbcTemplate">
<property name="dataSource" ref="druidDataSource"/>
</bean>
</beans>
|
(druid.properties 省略了,按照指定的 jdbc.xxx 格式写就行了)
然后调用一发 BookService 的 checkout,很舒适。可是出现了异常该怎么办?
回想一下,发现我们原来的 TransactionFilter 跟前面讲的环绕通知好像啊!能不能让 aop 帮我们做呢?
配置文件中加入:
1
2
3
4
5
6
7
8
|
<bean id="transactionManager" class="org.springframework.jdbc.datasource.DataSourceTransactionManager">
<property name="dataSource" ref="druidDataSource"/>
</bean>
<tx:annotation-driven transaction-manager="transactionManager"/>
|
并且在事务的方法上加一个 @Transactional 就好了。非常地新鲜,非常地美味。
隔离级别
数据库的概念。脏读、幻读、不可重复读、两类更新丢失之类的数据库并发问题。

Jdbc 中有四种隔离级别,可以解决这些问题。mysql 默认的是可重复读。
事务传播
事务传播行为用来描述由某一个事务传播行为修饰的方法被嵌套进另一个方法的时事务如何传播。
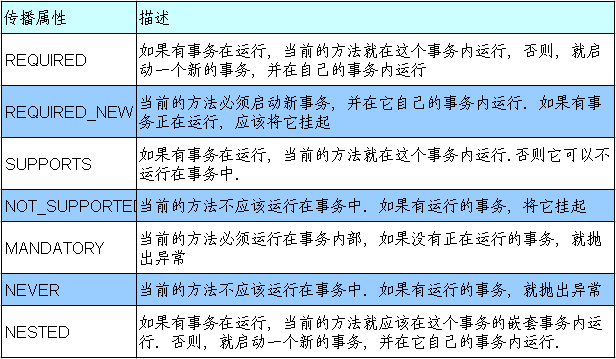
常用的是前两个。默认的是第一个。这种情况如果事务套事务,那么其实是一个事务,要爆炸全爆炸。
我们可以手动设置事务传播级别:
1
2
3
4
5
6
7
8
9
10
11
12
13
14
15
16
17
18
| @Service
public class BookService {
@Autowired
BookDao bookDao;
@Transactional(propagation = Propagation.REQUIRES_NEW)
public void checkout(String username, String isbn) {
int price = bookDao.getPrice(isbn);
bookDao.balance(username, price);
bookDao.updateStock(isbn);
}
@Transactional(propagation = Propagation.REQUIRED)
public void updatePrice(String isbn, int price) {
bookDao.updatePrice(isbn, price);
int i = 12 / 0;
}
}
|
1
2
3
4
5
6
7
8
9
10
11
| @Service
public class MultiService {
@Autowired
BookService bookService;
@Transactional
public void multiTx() {
bookService.checkout("Jerry", "ISBN-001");
bookService.updatePrice("ISBN-002", 998);
}
}
|
如果我在 updatePrice 里头加一个除零,那么 checkout 可以执行,updatePrice 不可以。这是因为 checkout 搞了一个新的事务出去顺利执行了。
但是如果换一下,checkout 是 requires_new,updatePrice 是 requires 呢?发现两个都爆炸了。这是因为 updatePrice 除零的异常抛到了 multiTx。注意requires_new 的挂起当前事务。建议看这里的图示分析和后三分钟的例子(112p)。
还有一点。如果是 required 嵌套 required,那么小事务的属性都是继承自大事务的。在小事务里头设置 timeout 什么的是没有用的。
requierd 其实就是用原来的 connection,requires_new 是开一个新的。注意上面的是两个类。如果写在一个类里头直接方法名调用方法,其实就是本类方法直接调用,不经过代理,自然只是一个事务。
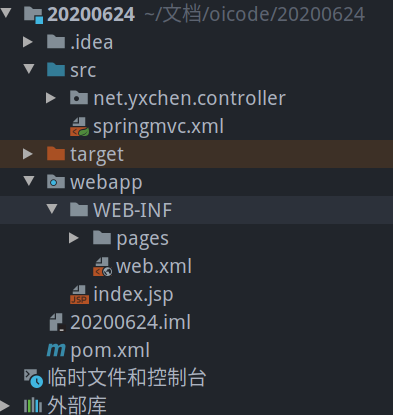
SpringMVC
spring mvc 的思想是有一个前端控制器智能派发请求。
贴一下 hello world 的代码。
pom.xml(部分)
1
2
3
4
5
6
7
8
9
10
11
12
13
14
15
16
17
18
19
20
21
22
23
24
25
26
27
28
29
30
31
32
33
34
35
36
37
38
39
40
41
42
43
44
45
46
47
48
49
50
51
52
53
54
55
56
| <properties>
<spring.version>5.2.3.RELEASE</spring.version>
<project.build.sourceEncoding>UTF-8</project.build.sourceEncoding>
<maven.compiler.source>1.7</maven.compiler.source>
<maven.compiler.target>1.7</maven.compiler.target>
</properties>
<dependencies>
<dependency>
<groupId>org.springframework</groupId>
<artifactId>spring-core</artifactId>
<version>${spring.version}</version>
</dependency>
<dependency>
<groupId>org.springframework</groupId>
<artifactId>spring-web</artifactId>
<version>${spring.version}</version>
</dependency>
<dependency>
<groupId>org.springframework</groupId>
<artifactId>spring-oxm</artifactId>
<version>${spring.version}</version>
</dependency>
<dependency>
<groupId>org.springframework</groupId>
<artifactId>spring-tx</artifactId>
<version>${spring.version}</version>
</dependency>
<dependency>
<groupId>org.springframework</groupId>
<artifactId>spring-jdbc</artifactId>
<version>${spring.version}</version>
</dependency>
<dependency>
<groupId>org.springframework</groupId>
<artifactId>spring-webmvc</artifactId>
<version>${spring.version}</version>
</dependency>
<dependency>
<groupId>org.springframework</groupId>
<artifactId>spring-aop</artifactId>
<version>${spring.version}</version>
</dependency>
<dependency>
<groupId>org.springframework</groupId>
<artifactId>spring-context-support</artifactId>
<version>${spring.version}</version>
</dependency>
<dependency>
<groupId>org.springframework</groupId>
<artifactId>spring-test</artifactId>
<version>${spring.version}</version>
</dependency>
</dependencies>
|
web.xml
1
2
3
4
5
6
7
8
9
10
11
12
13
14
15
16
17
18
19
20
21
| <!DOCTYPE web-app PUBLIC
"-//Sun Microsystems, Inc.//DTD Web Application 2.3//EN"
"http://java.sun.com/dtd/web-app_2_3.dtd" >
<web-app>
<display-name>Archetype Created Web Application</display-name>
<servlet>
<servlet-name>dispatcher</servlet-name>
<servlet-class>org.springframework.web.servlet.DispatcherServlet</servlet-class>
<init-param>
<param-name>contextConfigLocation</param-name>
<param-value>classpath:springmvc.xml</param-value>
</init-param>
<load-on-startup>1</load-on-startup>
</servlet>
<servlet-mapping>
<servlet-name>dispatcher</servlet-name>
<url-pattern>/</url-pattern>
</servlet-mapping>
</web-app>
|
springmvc.xml
1
2
3
4
5
6
7
8
9
10
11
| <?xml version="1.0" encoding="UTF-8"?>
<beans xmlns="http://www.springframework.org/schema/beans"
xmlns:xsi="http://www.w3.org/2001/XMLSchema-instance"
xmlns:content="http://www.springframework.org/schema/context"
xsi:schemaLocation="http://www.springframework.org/schema/beans http://www.springframework.org/schema/beans/spring-beans.xsd http://www.springframework.org/schema/context https://www.springframework.org/schema/context/spring-context.xsd">
<content:component-scan base-package="net.yxchen"/>
<bean class="org.springframework.web.servlet.view.InternalResourceViewResolver">
<property name="prefix" value="/WEB-INF/pages/"/>
<property name="suffix" value=".jsp"/>
</bean>
</beans>
|
HelloController.java
1
2
3
4
5
6
7
8
9
10
11
12
13
| package net.yxchen.controller;
import org.springframework.stereotype.Controller;
import org.springframework.web.bind.annotation.RequestMapping;
@Controller
public class HelloController {
@RequestMapping("/hello")
public String hello() {
System.out.println("handling hello");
return "success";
}
}
|
WEB-INF/pages/success.jsp(部分)
1
2
3
| <body>
<h1>success</h1>
</body>
|
index.jsp(部分)
1
2
3
| <body>
<a href="hello">hello</a>
</body>
|
这里要提一下那个 / 和 /*。其实在默认的 web.xml 里头有一个 defaultservlet map 到 /,一个 jspservlet map 到 *。如果我们的 dispatcher map 到 /,就相当于所有的静态资源都被我们的 dispatcher 管控。这时候如果请求 index.html,必然爆炸,因为 dispatcher 没有写处理 index.html 的。但是 jsp 因为不会被拦截,所以正常。
顺带一提,RequestMapping 也可以加在类上。这就是钦点基准路径了。
1
2
3
4
5
6
7
8
9
| @Controller
@RequestMapping("/qwq")
public class HelloController {
@RequestMapping("/hello")
public String hello() {
System.out.println("handling hello");
return "success";
}
}
|
想访问这个方法,地址就是 /qwq/hello。
可以使用 method = RequestMethod.POST 来钦点接受请求的方式。用 params={"qwq1", "!qwq2", "qwq3=qaq", "qwq4!=qvq"} 表示参数必须带上 qwq1,不能带 qwq2,qwq3 必须是 qaq,qwq4 不得是 qvq(空串、null 都可以)。可以用 headers 钦点请求头。
在写路径的时候,可以用一个 ? 表示任意一个字符,用 * 表示任意多个字符,或者写在两个斜线中间表示任意一层路径。用两个 * 写在两个斜线中间表示任意多层路径。
可以使用 @PathVariable 在 url 中用占位符。
1
2
3
4
5
| @RequestMapping("/hello/{id}")
public String hello(@PathVariable("id") String id) {
System.out.println("id 是 " + id);
return "success";
}
|